In Season

Spicy Sweet Onion Dip

Saturday, January 30, 2010

Maple Walnut Scones

IMG_0342
I do not have the words to describe how goood (rhymes with food) these scones are. So goood, we made them twice last weekend. Well, actually I made them once on Saturday because the recipe made twelve. While I was making them I was thinking I would have to halve the recipe before I shared it with you, but there is no reason for that. If you make the whole batch on Saturday, you can eat them again on Sunday (like we did), and Monday, and ... or you can freeze the ones you are not baking right away and pop them in the oven as you need them. You don't have to thaw them. They taste just as good. The only thing that stopped me from making these sooner was one ingredient, the maple extract. I ended up using Maple Flavoring that I found at King Arthur. I always hesitate recommending recipes that have ingredients that are hard to come by. I figure if I can make it happen in Fairbanks, well so can most other folks. You could also use grade B maple syrup and just get a milder maple flavor.
Here is a little secret I learned along my scone making journey. The best way to a lovely, light, and flakey scone is to rub the butter into flat flakey pieces, rather than little chunks. How to do this? Take your hand as though you were about to put on a mitten. Now, put a piece of butter between your thumb and halfway down your middle finger. Now, slide you thumb to the top of your finger. This is the motion you will make as you incorporate the butter. Remember, don't overwork the dough as the butter will soften. You want it to stay as cold as possible while you incorporate it.
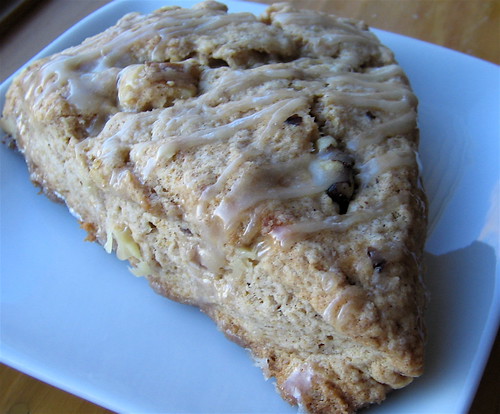
Now, I know that I told you that these other scones were perfection, and they are, but so are these ones. So many perfect scones, so little time to eat them all...
But I'm trying.
Maple Walnut Scones
Makes 12 large scones

Scones:
4 cups all-purpose flour
1/2 cup sugar
1 tbsp baking powder
1/2 tsp baking soda
1/2 tsp salt
1 1/2 tsp cinnamon
1 1/2 cups (3 sticks) unsalted butter, chilled and cut into 1/2 inch cubes
1 large egg
1 cup whole milk
2 teaspoons all natural maple flavoring (extract or grade B maple syrup)
1 cup toasted walnuts

Glaze
1/2 cup powdered sugar
2 tbsp or a little more maple syrup

Preheat oven to 300 degrees and line baking sheet with parchment paper.

In a large bowl, combine first six ingredients. Add the butter using your fingers to rub the butter into large flakes and incorporate into the flour.

In a medium bowl whisk together the egg and milk with the maple flavoring. Make a well in the dry ingredients and slowly pour wet ingredients into the well. Using your hands, knead until all ingredients just come together.

Coarsely chop walnuts and add to the mix. Gently incorporate into dough. Divide dough in half and turn one half onto a lightly floured surface. Shape the dough into a disc and cut into six wedge shaped pieces. Transfer wedges to baking sheet and repeat with other half of dough.

Bake on center rack of oven for 25 to 30 minutes until scones are golden brown. Transfer to a cooling rack and let sit while you prepare the glaze.

For glaze place powdered sugar in a small bowl (I use a measuring cup as the spout make it easy to pour the glaze. Slowly add maple syrup while whisking to achieve desired consistency. Drizzle glaze over tops of slightly cooled scones. Serve warm.

Tuesday, January 26, 2010

Appleberry Pâtes de Fruits

I have been wanting to make Pâte de Fruits for a long time, but it wasn’t until the apples overflowed the fruit basket and started rolling across the counter and threatened to leap to the floor that I really felt motivated. Pâte de Fruits always look so lovely on other blogs, I have admired others Strawberry Rhubarb and Raspberry flavors. It wasn’t until I found Alice Waters recipe that contained no added pectin that I decided I was ready to give them a go. They really are worth it. I’m looking forward to our summer biking season, I see these replacing Shot Blocks (sorry Cliff Bar corporation) in my bike jersey.
You can make these Pâte de Fruits with any variety of apples and fruit you have on hand. You can also make them with just apple. Our winter CSA has thrown a whole mix of apples at us over the last few weeks, so to be honest I’m not sure what kind of apples I used. I recommend using the kind you like to eat. I like super sour candies, so I would love to try them with Granny Smith in the future. Don’t attempt to make them with just berries however. It is the pectin in the apples that makes them become jellied. There are other similar recipes that use the addition of pectin or gelatin out there if you want to make other fruit jellies such as Turkish Delight, a rose water jelly. Also, most recipes call for a lot of added sugar to offset the lemon. I recommend trying them without first as I found them plenty sweet with just the rolling in sugar.
Make sure you give yourself plenty of time to make these treats. They can be quite time consuming. Not the kind of project to start on a weeknight like I did. They are not difficult, but they do need quite a bit of time and attention during the simmering stage as you don’t want them to burn.
Appleberry Pâtes de Fruits
7 apples, peeled, quartered and cored
¼ cup low bush cranberries or lingonberries
½ cup wild blueberries
1 cup water
Juice of 1 lemon
Sugar for coating
Start by lightly rubbing an 8-by-8-inch square baking pan with a flavorless vegetable oil (canola or safflower). Line pan with parchment and lightly oil parchment.
In a large pot combine the apples, berries, and the water and cook over medium heat until soft, about 20 minutes. Using an immersion blender (or regular blender), process the mixture until smooth.
Pass the mixture through a fine mesh sieve. Return the puree to the pot and stir in the lemon juice.
Simmer over low heat, stirring often, for about 2 hours. As the mixture cooks and reduces, it starts to thicken and bubble. Scrape the bottom of the pan while stirring to make sure nothing is sticking and burning. The puree is done when it holds a mounded shape. To be sure, you can chill a small amount on a plate in the freezer. It should appear and feel jellied.
Spread the mixture evenly in the prepared pan. Cool for several hours or overnight. When cooled completely, invert onto a parchment lined baking sheet. Remove the top layer of parchment paper. Leave to dry, uncovered, overnight. Put the paste in a 150° F oven for an hour or more until firm. Let cool completely before cutting. If the center is still not set, you can put them back in the oven, even after cutting. The paste can be stored whole, wrapped tightly in plastic. Or trim the edges and cut into 1-inch pieces before wrapping. Store at room temperature or refrigerated for up to a year. Before serving toss the pieces in granulated sugar to serve.

Monday, January 25, 2010

Jumping for Joy

The sun is out.
It's 15 degrees above zero.
Oh glorious day!!

Friday, January 22, 2010

Super Easy Chocolate Cake

I recently started reading The Happiness Project. I still haven’t decided whether or not it is for me, but the task last weekend was to Toss and Organize. Believe it or not all my clothes closets were pretty organized. There is however one cupboard in my kitchen that has been driving me crazy. It is worse than the junk drawer, it is the junk cupboard. To make matters worse, I would really like to store my baking supplies there, so from time to time I have also added baking supplies to the mix. To say the least I never know what I might find in there.Well, what I found out I had was a lot of chocolate!! Milk, Mexican, Semi-sweet, White, Cocoa Powder of various Dutchness, and more bags of Ghirardelli Bittersweet chips than I could count! I go through phases with things I become obsessed with stocking up on, it seems to go along with sale items. Things like beans, tomato sauce, and obviously Ghirardelli Chocolate Chips are always purchased on sale. The problem is that I purchase them every time they go on sale.
As a reward for my hard work, I decided to give Molly’s chocolate cake another try. I actually made this cake a few weeks ago and it must not have stayed in the oven long enough and never set up. This is why I call it Super Easy Chocolate Cake. It seems that anything with words like simple or easy in the title mean I will certainly screw it up. Honestly, I have faith that you can do much better. This time I added five minutes to the baking time and this time, topped with a little Grand Marnier whip cream it was perfect!!
Super Easy Chocolate Cake
adapted slightly from Orangette

7 ounces good quality dark chocolate chips (I used Ghirardelli Bittersweet)
7 ounces unsalted butter cut into small cubes
1 1/3 cup granulated sugar
5 large eggs
1 tbsp unbleached all-purpose flour

Preheat the oven to 375 degrees Fahrenheit, and butter an 8-inch round cake pan. Line the base of the pan with parchment, and butter the parchment.

Melt the chocolate and butter gently with the butter in a double boiler or in the microwave, stirring regularly to combine. Add the sugar to the chocolate-butter mixture, stirring well, and set aside to cool for a few moments. Then add the eggs one by one, stirring well after each addition, and then add the flour. The batter should be smooth and dark.

Pour batter into the buttered cake pan and bake for approximately 25 minutes, or until the center of the cake looks set and the top is shiny and crackly-looking. Let the cake cool in its pan on a rack for 10 minutes; then carefully turn the cake out of the pan and revert it, so that the crackly side is facing upward. Allow to cool completely. The cake will deflate slightly as it cools.
Serve in wedges at room temperature with a dollop of whipped cream (a little Grand Marnier makes it really good).
BTW…I had a little help cleaning out the cupboard. Brody cleaned up the half empty peanut butter jars!

An old summer love pays a visit...

Denali from Fairbanks
What were you thinking?

Monday, January 18, 2010

Can I come in?

Did you forget someone?
Can I come in?
Please?

Sunday, January 17, 2010

Potato Pizza

I had never even heard of potato pizza until this past spring when a visiting friend was looking through my cookbooks. She insisted that I give it a try, so I put it on the list of things to make when the potatoes were ready in the fall. Of course, I promptly forgot. Then a few weeks ago I was browsing Ree Drummond's cookbook at the bookstore and saw her recipe for potato pizza. It was funny because she calls it cowgirl food, as in cowboys don't really like it. I know better than to mess with pizza night at our house. This past Wednesday with the disclaimer that this will not replace our traditional pizza for the week I made potato pizza. I absolutely loved it. It was not such a hit with the male member of my house either, so maybe Ree was right or maybe there is just a fear that this could replace regular pizza night. This one will have to go in the Single Girl rotation. I call the nights that David is away or working late my "single girl nights". I highly recommend it.


Potato Pizza Print
Inspired by Cafe Flora and Pioneer Woman

8 slices bacon
1 Leek
3 Tbsp (or less)extra virgin olive oil
1 clove finely chopped garlic
3 medium red potatoes
3/4 mozzarella cheese shredded and loosely packed
2 oz crumbled goat cheese
¼ cup Parmesan cheese, finely grated
Coarse salt or Fleur de sel
Freshly ground black pepper
Unbaked pizza crust (I have a recipe for one here)

Preheat pizza stone in oven to 500 degrees
Fry bacon in a heavy skillet over medium heat until cooked but not crisp. Remove bacon from pan and pour out the grease, but do not clean the pan. Cut bacon into ½ inch pieces and set aside.

Return skillet to stove and turn heat to medium-low.
Slice leeks very thinly. Add leeks to the same pan and sauté over medium-low heat until soft, about 3 minutes. Remove from heat and set aside.
Slice potatoes very thin. I’m sure a mandolin would work great here.
Roll out pizza crust, and brush a thin layer of olive oil over crust. Sprinkle with garlic and a light amount of salt. Arrange potatoes in a single layer slightly overlapping edges. Sprinkle potatoes lightly with salt, then lightly sprinkle grated mozzarella over top.
Place sautéed leeks over the top of the cheese.
Next, sprinkle the fried bacon pieces over the top, followed by crumbled goat cheese and grated parmesan.
Finally, sprinkle with freshly ground black pepper.
Bake pizza for 8 to 11 minutes, or until edges of crust are golden brown and cheese is melted and bubbly. Cut and serve immediately.

Down in the Valley...


Monday, January 11, 2010

This is Fairbanks...


There are some days and some moments that just feel like Fairbanks. Today is one of the days of cold quiet beauty. This is the answer to the question "What is Fairbanks like?".

Saturday, January 9, 2010

All Natural Peanut Butter


I was hoping the peanut butter would freeze up a little quicker. The chickadees don't seem to mind.

Bootie Shot


Sorry Brody. I know you didn't want your picture taken. Luckily it was dark out and none of the sled dogs saw you looking so silly.

Friday, January 8, 2010

Darkness...


How do we do it you ask? All that darkness? I love this video as it emphasizes just how short our days are in the winter. Honestly, that video hardly feels like it is time lapsed. Aren’t our days really only two minutes long?
Really, what does a person do when they have two weeks off during the darkest time of year? First of all we sleep a lot. We up our Netflix subscription from one at a time to three at a time. Has anyone seen anything good lately? We have been picking a lot of stinkers. I have been enjoying Top Chef. Of course this has made me far more critical of all our meals. My new favorite saying at dinner is, “the meat is overcooked”. Never in my life have I cared if the meat was overcooked!
All this Top Chef and darkness has inspired a lot of time in the kitchen. I just can’t bear to take those horrible flash photos. I keep thinking I should invest in some lights for photography. It would make for much more inspiring posts.
I did make two major discoveries over the holidays. It all started with Nigella Lawson on NPR, followed by cooking her Chocolate Chip Chili. While I was searching for the Chili recipe, I found her granola bar recipe. At this point forces beyond my control steered my car into the Barnes and Noble parking lot and forced me to buy Nigella Christmas. After Christmas Morning Muffins, Bourbon Glazed Ribs, Corn Pudding, …you get the idea. I am hooked on Nigella. I too want to be a domestic goddess, is there anything this woman can’t do? The fact that she can get me to do it without burning down the house is a miracle. We often refer to the smoke detector as the dinner bell!
The second thing that got me out of bed in the dark morning hours was a love story I started reading. You think I am kidding, but no I am serious, I spent hours of my time reading Ree Drummond’s love story. Now, if that is not a guilty pleasure, I’m not sure what is. Luckily, in trying to figure out if I was on Chapter XXXVIII or XXVII, I also stumbled upon some pretty yummy looking recipes. I ended up making Pioneer Woman’s Rosemary Dinner Rolls twice and finally was inspired to make French Onion Soup. I have had a block of Gruyere in my fridge for about a month waiting to find the right French Onion Soup recipe.
With the leftover Gruyere I was also inspired to make this lovely gratin for dinner the other night.
After this wordy post, I’m sure you are all hoping I run out and get myself some photo lights. More pictures, please…
I’ll think about it!!

Sunday, January 3, 2010

Winter Light


Baked Apple French Toast

We get so little light this time of year, but the little we do get is so spectacular. I love to get the woodstove cranking during that limited time, so I can lift the insulated shades and let the light splash across the living room...
Returning to work tomorrow is going to be challenging. When our break started nearly two weeks ago I couldn't sleep a second past 7:00 a.m., but slowly a few minutes more each day reached a climax of rising at 10:00 a.m. yesterday morning!! Thank goodness I had made this Baked Apple French toast the night before. I was able to put the coffee on and just toss this in the oven, it was ready just in time for sunrise at 11:00 a.m.!!
Baked Apple French Toast (Print Recipe)
adapted from here, here, and here

Ingredients:
10 thick slices of Challah bread
6 eggs beaten
2 3/4 cups milk
2/3 cup sugar
1 vanilla bean scraped clean or 1 tablespoon vanilla extract
4 medium apples, peeled and thinly sliced
1 tablespoon cinnamon
1 teaspoon nutmeg
1 tablespoon butter
1/4 cup chopped and toasted pecans (optional)

Place bread in a greased (don't forget the greased part, I did!) 9x13 inch glass baking dish.
Combine eggs, milk, sugar, and vanilla bean. Pour 1/2 mixture over the bread. Top with 1/2 the apples slices. Sprinkle slices with half the cinnamon and nutmeg. Top with remaining apples followed by remainder of egg mixture. Sprinkle the remaining cinnamon and nutmeg over the top and dot with small pea size squares of butter. Cover and chill overnight.
The next morning bake at 350 degrees for one hour. Top with chopped pecans. Let sit for 5 minutes and serve with maple syrup.
*notes: I made half the recipe in a 7x11 inch pan and it was perfect for two of us. The next time I make this, and there will be a next time soon...I will experiment with using some sort of pralines on top. I felt like the pecans needed a little something to make them stick.
Related Posts with Thumbnails